
'Sometimes
you want to show only part of your artwork, not the whole thing.
Deleting portions of your work is not recommended in general especially
since illustrator is equipped with a powerful feature called Clipping
Masks.'
According to the definition given by Adobe, ''A clipping mask
is an object whose shape masks other artwork so that only areas that
lie within the shape are visible. I say you can think of a mask like
watching a scene - image - illustration through a keyhole. The visible
part of the scene is what lies beneath the 'Mask'.
Let me explain what I mean.
So start Illustrator, create a new document and import an image of your like. Select File > Place... from the Menu bar.


At the new window, browse until
you locate a picture, let's say, somewhere in your computer so we can
experiment with. Select it and click Place.

The photo has now been imported into Illustrator workspace.

Select the rectangle tool  from the Toolbox and create a rectangle on top of the photograph similar to the one shown below. This object is called the clipping path.
 from the Toolbox and create a rectangle on top of the photograph similar to the one shown below. This object is called the clipping path.
Select both the rectangle and the photo (if you don't know how... check my tutorial on Selection Tools). From the Menu bar select Object > Clipping Mask > Make.

If you have followed along you should end up with something like the following.

The rule is that the object
that stands on top of the stacking order will be used as the mask and
the part of the image that lies inside this shape will be visible.
The objects that you mask are moved into the clipping mask’s group in the Layers panel as seen below. (Open the layers panel Windows > Layers, or simply press F7.)
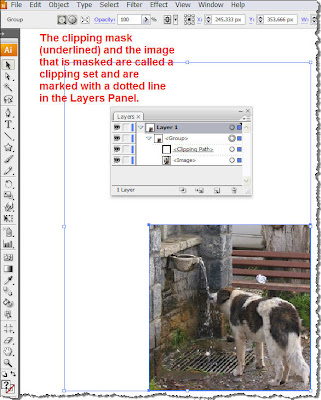
As you see, we managed to keep the ugly car out of our sight. There are two frames with a blue border. The larger border is the outline of the original image. The smaller one is the outline of our clipping mask.
Now, take a look at
the top panel. If you have deselected the clipping mask, you will not be
able to see this tool bar, so go ahead and just select it again. We will focus on the two available editing modes while working with a clipping mask's group.

Have a look on the
left hand side on the control panel. You have two options. You can
either edit the 'contents' meaning the original image a portion of which
you mask, or you can edit the clipping path itself.
Click on the Edit Clipping Path button  . You will see that the only border available is that of the mask. Select the path with the Selection Tool
  and play around with the size of the rectangle or choose the Direct Selection Tool
  and adjust individual anchor points and see what happens.
 . You will see that the only border available is that of the mask. Select the path with the Selection Tool
  and play around with the size of the rectangle or choose the Direct Selection Tool
  and adjust individual anchor points and see what happens.


Click on the Edit Contents  button and move the original image, thus revealing a different portion
of the photograph. This way you can make adjustments concerning the part
of the image you want to show every time.
button and move the original image, thus revealing a different portion
of the photograph. This way you can make adjustments concerning the part
of the image you want to show every time.
 button and move the original image, thus revealing a different portion
of the photograph. This way you can make adjustments concerning the part
of the image you want to show every time.
button and move the original image, thus revealing a different portion
of the photograph. This way you can make adjustments concerning the part
of the image you want to show every time.


Let's say, that for some reason
you do not need the mask anymore. How do you get rid of it? Very simple
actually, select the mask, go to Object menu > Clipping Mask >
Release...

This way you get the image and the rectangle independent from one another as two separate objects so you can delete the rectangle and move on with your design.
USEFUL TIP
In case you have a rectangular mask in mind, there is an even quicker way to achieve the final result. Place the image, select it and from the top panel and select Mask.
In case you have a rectangular mask in mind, there is an even quicker way to achieve the final result. Place the image, select it and from the top panel and select Mask.

By clicking the Mask button, a
rectangular mask is automatically created on top of the image you
placed, and you are transferred to the Clipping Mask environment. This
automatically generated mask has the exact same dimensions with those of
your image.

Now you are in clipping path mode
(EXACTLY LIKE SHOWN BEFORE) so all you have to do is picking the
selection tool you want and adjust the size and shape of the mask.

Exactly the same result, but much quicker... You do not have to create an extra rectangle on top of the image (to be used as a mask) and then edit its size and shape. Pretty cool.
As you will have probably guessed by now, any kind of shape can be used as a mask.
So roll your actions back and
replace the rectangular shape with a star, circle or even Text. Below
you can see the result with a star used as my clipping path.
 Another
useful application of clipping masks is when working with text. Instead
of having a 'dull' and not so interesting fill colour, find a smashing
image and use it as the text fill. Here is how you do it. Choose a thick
Font (I used Franklin Gothic Medium Cond) and write something on top of your image. Select both the text and the image and create the Clipping Mask as explained before.
Another
useful application of clipping masks is when working with text. Instead
of having a 'dull' and not so interesting fill colour, find a smashing
image and use it as the text fill. Here is how you do it. Choose a thick
Font (I used Franklin Gothic Medium Cond) and write something on top of your image. Select both the text and the image and create the Clipping Mask as explained before.

Furthermore, you can still edit
your text like you would normally do (i.e. apply bold style to the text
etc). The result can prove quite spectacular and your text may actually
make the difference with great fills.
LAYER CLIPPING MASK
Another functionality that offers
more flexibility in Illustrator is applying masks within the Layers
panel. In brief, you use a layer to mask another layer. Let me show you
an example.
Here I created a new document, and
placed the same photo (of the doggy...). I opened the Layers Panel and
placed it somewhere near my image so that I can easily access it. I went
on and created a closed path (in yellow) that contains just the dog
drinking water. I left out the car and the background of the image.

My original photo
layer contains two elements. The Image element that contains the
photograph, and the Path element that contains the yellow outline. My
intention is to use this yellow stroked path as my mask so that I can
only see what is inside that path. In order to achieve that I am going
to use the Layer Mask.
Since it refers to a layer and its
contents, you do not have to select anything. All you have to do is
click on the Layer that contains the image and the path to select it,
and then click on the Make Clipping Mask button shown below.
 The result is shown below:

What happened is that the topmost
object (clipping path) inside the original photo layer masked everything
below it (Image). Now you can move forward with your illustration and
create nicer background or add fancier elements in your artwork. Did you
decide at a phase of the design that you do not want this layer
masking? No problem. Select the layer again and just click the Make
Clipping Mask button  again. Your masking is gone.
That simple...hope you find it useful!
 again. Your masking is gone.
That simple...hope you find it useful!


0 comments :
Post a Comment