
'One of the coolest functions inside
illustrator is the 'Opacity Mask'. Opacity Masks set various
transparency levels in vector Artwork, Text or even photographs.'
1. The Concept
All right then, start Illustrator and Place an image of your like on the artboard.
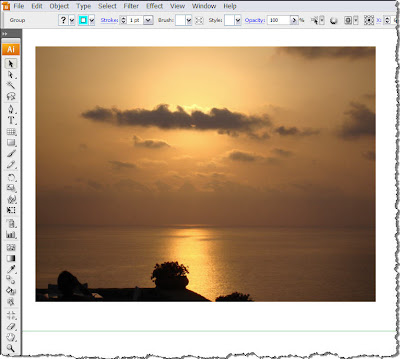
This one is a shot I took during my summer holidays at the end of August... Nice stuff...
Anyway, back to work...Create a shape like the one shown below and place it on top of your photograph.
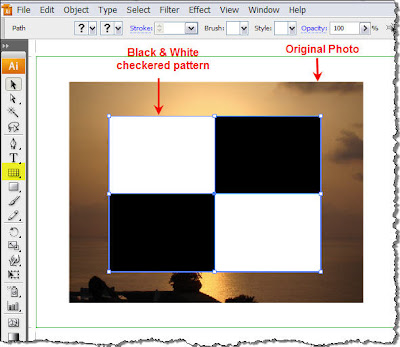
For those wondering how I created this shape, I must say that there are quite a few easy methods to do it. Speaking for myself, I used the Rectangular Grid Tool (highlighted in yellow in the above image).
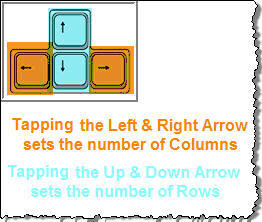
Click and drag on top of the photograph, but before releasing the mouse, press the arrow keys on your keyboard. You will see that tapping the Left & Right keys adjust the number of the columns of your grid, while the Up & Down arrows adjust the number of the rows. This way, I created a 2x2 grid on top of my photograph.
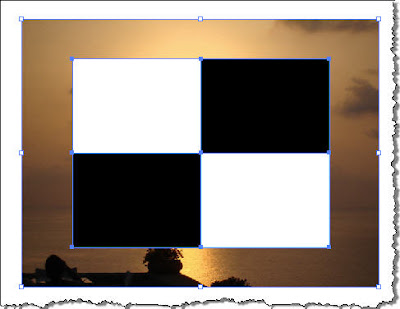
The next step is to break the grid apart so you can fill each box separately. So open the Pathfinder Panel and divide the grid into 4 separate boxes so you can edit each one of them. If you do not know or remember how the Pathfinder works, have a quick look in my Pathfinder panel tutorial. Finally, fill 2 of the boxes with Black. Before you go on, do not forget to group all 4 boxes. Select all 4 and Group them.
As we show in a previous tutorial about Clipping Masks, only that part of the image that lies underneath the path used as a mask will be visible. Opacity Masks on the other hand, reveal what lies underneath them depending on the Luminosity values of the fill of the path that is used as a Mask. This means that depending on how light or dark the mask is, will adjust the visibility of the image below.
So let's see all that in action...
With the Selection Tool (V) select both the checkered pattern and the Photograph beneath it.
Now you have selected two objects. The photo and the grid. Have a look on the right panel dock, locate the Transparency Panel icon and click to open it. Click on the double arrows to expand the panel and see all available data and settings.
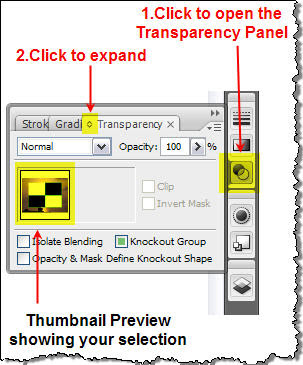
In the panel you can see that there is a thumbnail preview that shows you what your selected objects are. We will explain all this in detail later so for the time being ignore it.
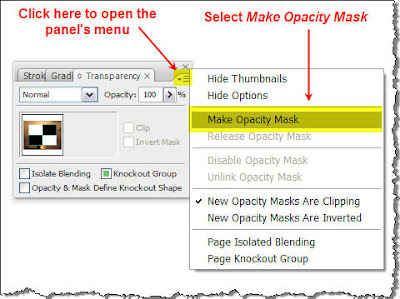
OK, now it's time for the good part. Click on the top right corner of the panel to pop up a flyout menu, and select Make Opacity Mask.
Now check what has happened to your image.
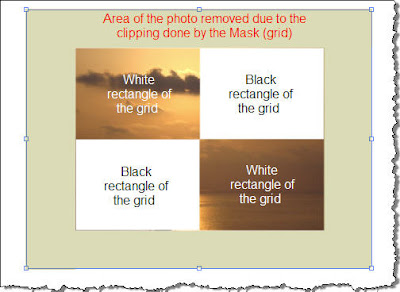
As you see, the Opacity Mask has been succesfully applied and the photograph has been clipped to the outer dimensions of the grid. Since it's all based in Luminosity, and since you can not get any lighter color than White, the parts of the photograph that lie underneath the white areas of the grid will be fully visible (100% opaque - can not see through). On the other hand, areas of the photograph that lie underneath the black rectangles are no longer visible - they have become transparent (0% Opacity - can see through). This means that any object you place behind the photograph will be visible on these areas.
In this example there are two discrete luminous states: 1 White - 2 Black translated in two discrete visibility states of the final image: 1 Opaque - 2 Fully Transparent. The cool thing though about Opacity Masks in Illustrator is that there is no limit to how many luminous levels (steps) you can use in your mask. Check out the following graphic.
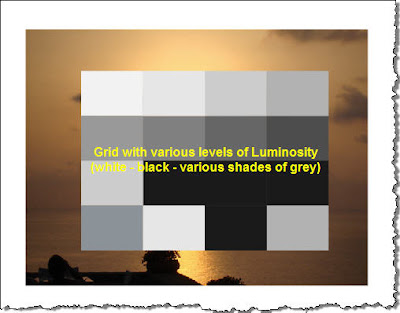 The
black and white grid has been replaced by a grid that contains more
cells each one with a different shade of grey. Repeat the same procedure
like before and apply an Opacity Mask. The result should look like the
following:
The
black and white grid has been replaced by a grid that contains more
cells each one with a different shade of grey. Repeat the same procedure
like before and apply an Opacity Mask. The result should look like the
following:
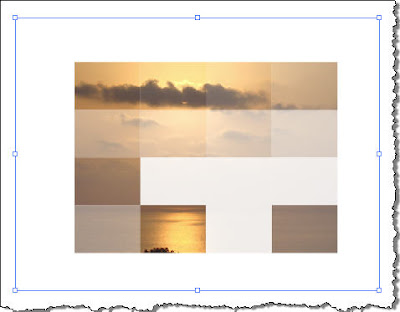
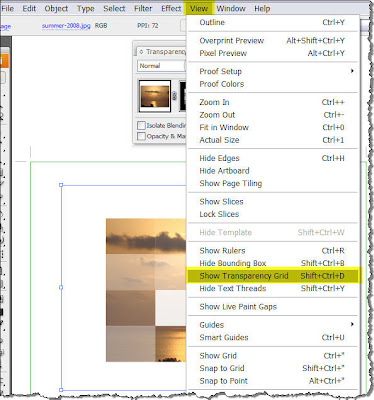
The photograph has been clipped but this time it is not just either OPAQUE or FULLY TRANSPARENT. Since there are rectangle fills with various level of brightness, the result is mixture of areas with different levels of Transparency. Let me show you what I mean. From the menu bar choose VIEW > Show Transparency Grid (Or simply press SHIFT+CTRL+D on your keyboard).
What happens is that your artboard is now filled with a checkered board pattern that helps you see the various levels of transparency applied to your photo depending on the fill of the grid rectangles used as a mask. Actually you now look through the image.
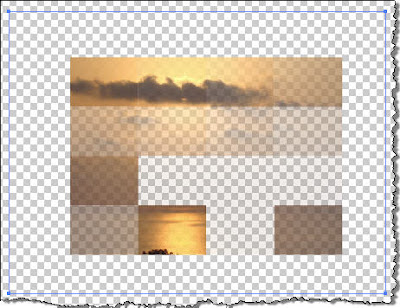
In this case we still have discrete luminsity levels that produce discrete transparency levels of the final impage. I hope that by now you have already guessed where I am getting at.
What if we want a smoother transparency transition to our final image? Let's say we want our image to start from 100% Opaque and gradually smoothly turn to 100% transparent. Then all you have to do is to create a mask on top of your image with a nice black to white (or any other colors actually) Gradient. (Don't ask me about Gradients... go check my post All about Gradients).
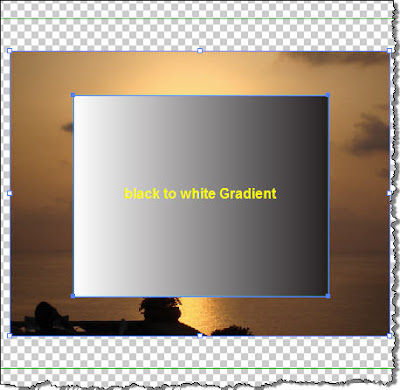
Apply an Opacity Mask and there you go...
As you see, starting from the black areas of the rectangle the output is fully transparent and as you move towards the left, it gradually and smoothly turns opaque. Cool stuff...
2. The Transparency Panel
Let's spend some time to check the Transparency Panel.
After I have applied the Opacity Mask in my last image the Transparency Panel looked like that:
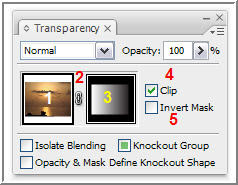
First you notice that there are two thumbnails available (ITEMS 1 & 3), one showing the photograph (ITEM 1) and one showing the mask (ITEM 3) with a lock icon in between (ITEM 2). By default the photo and the mask are locked together and what this does is that if let's say you decide to move the photo, then the mask is moved together. If for some reason you want to move the photograph but you do not want to move the mask (maybe you want to show another part of the photo), then click on the lock icon (it disappears...) and reposition the photo. The mask will stay in place.
If you now click on the Mask Thumbnail (ITEM 3), then you can edit the Gradient the way you would normally do. You may perhaps wanna pick the Gradient tool (like shown in a previous post) and adjust the Gradient like shown below.
 Pay attention when you click on the Mask thumbnail because Illustrator automatically switches to Opacity Mask Mode.
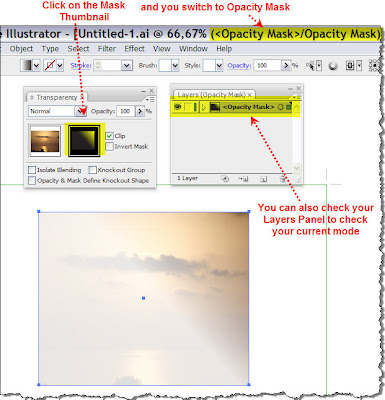
You can always look at Illustrator's title bar or open your Layers Panel (press F7) and check the mode you're working in.
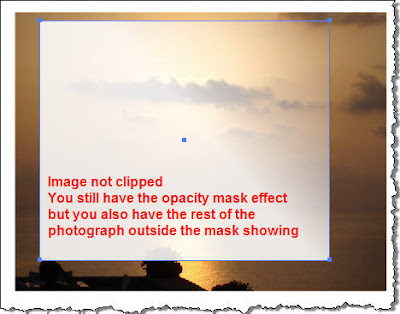
OK... what happens if you uncheck the clip checkbox (ITEM 4)... Actually, the areas of the photograph outside the boundaries of the mask are visible after the Opacity Mask has been applied. It's your call...
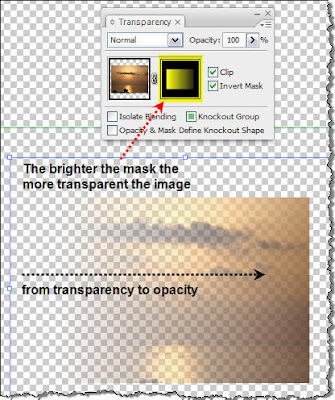
 Finally,
clicking in the Invert Mask checkbox does exactly what it says. As we
discussed earlier, when you apply an Opacity Mask, lighter areas of the
Mask cause less transparency on the areas of the object that lies
underneath, while darker colors cause more transparency. If you check
this box, it works the other way round.
Finally,
clicking in the Invert Mask checkbox does exactly what it says. As we
discussed earlier, when you apply an Opacity Mask, lighter areas of the
Mask cause less transparency on the areas of the object that lies
underneath, while darker colors cause more transparency. If you check
this box, it works the other way round.
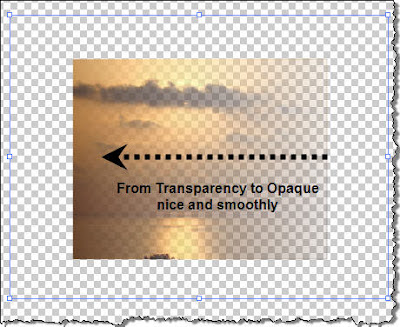
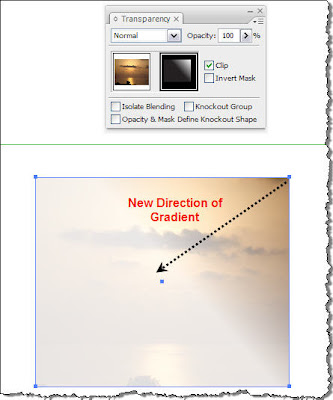
To give you an example, let's go back to a previous image.
If I click in the checkbox the transparency changes direction. It goes reverse as shown below.
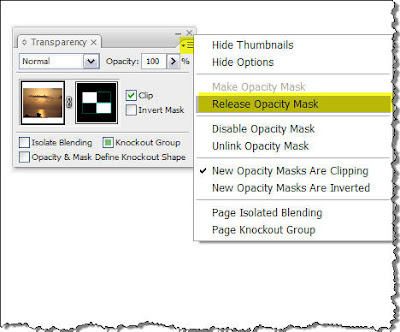
Finally, how can you remove the Opacity Mask? Very simple, just click on the masked artwork and then select Release Opacity Mask from the Transparency panel menu. The masking object reappears on top of the objects that were masked.
CU and Remember... the sky is the limit...
1. The Concept
All right then, start Illustrator and Place an image of your like on the artboard.

This one is a shot I took during my summer holidays at the end of August... Nice stuff...
Anyway, back to work...Create a shape like the one shown below and place it on top of your photograph.

For those wondering how I created this shape, I must say that there are quite a few easy methods to do it. Speaking for myself, I used the Rectangular Grid Tool
 (highlighted in yellow in the above image).
Click and drag on top of the photograph, but before releasing the mouse, press the arrow keys on your keyboard. You will see that tapping the Left & Right keys adjust the number of the columns of your grid, while the Up & Down arrows adjust the number of the rows. This way, I created a 2x2 grid on top of my photograph.

The next step is to break the grid apart so you can fill each box separately. So open the Pathfinder Panel and divide the grid into 4 separate boxes so you can edit each one of them. If you do not know or remember how the Pathfinder works, have a quick look in my Pathfinder panel tutorial. Finally, fill 2 of the boxes with Black. Before you go on, do not forget to group all 4 boxes. Select all 4 and Group them.
As we show in a previous tutorial about Clipping Masks, only that part of the image that lies underneath the path used as a mask will be visible. Opacity Masks on the other hand, reveal what lies underneath them depending on the Luminosity values of the fill of the path that is used as a Mask. This means that depending on how light or dark the mask is, will adjust the visibility of the image below.
So let's see all that in action...
With the Selection Tool (V)

Now you have selected two objects. The photo and the grid. Have a look on the right panel dock, locate the Transparency Panel icon
In the panel you can see that there is a thumbnail preview that shows you what your selected objects are. We will explain all this in detail later so for the time being ignore it.
OK, now it's time for the good part. Click on the top right corner of the panel to pop up a flyout menu, and select Make Opacity Mask.

Now check what has happened to your image.

As you see, the Opacity Mask has been succesfully applied and the photograph has been clipped to the outer dimensions of the grid. Since it's all based in Luminosity, and since you can not get any lighter color than White, the parts of the photograph that lie underneath the white areas of the grid will be fully visible (100% opaque - can not see through). On the other hand, areas of the photograph that lie underneath the black rectangles are no longer visible - they have become transparent (0% Opacity - can see through). This means that any object you place behind the photograph will be visible on these areas.

In this example there are two discrete luminous states: 1 White - 2 Black translated in two discrete visibility states of the final image: 1 Opaque - 2 Fully Transparent. The cool thing though about Opacity Masks in Illustrator is that there is no limit to how many luminous levels (steps) you can use in your mask. Check out the following graphic.
 The
black and white grid has been replaced by a grid that contains more
cells each one with a different shade of grey. Repeat the same procedure
like before and apply an Opacity Mask. The result should look like the
following:
The
black and white grid has been replaced by a grid that contains more
cells each one with a different shade of grey. Repeat the same procedure
like before and apply an Opacity Mask. The result should look like the
following:
The photograph has been clipped but this time it is not just either OPAQUE or FULLY TRANSPARENT. Since there are rectangle fills with various level of brightness, the result is mixture of areas with different levels of Transparency. Let me show you what I mean. From the menu bar choose VIEW > Show Transparency Grid (Or simply press SHIFT+CTRL+D on your keyboard).
What happens is that your artboard is now filled with a checkered board pattern that helps you see the various levels of transparency applied to your photo depending on the fill of the grid rectangles used as a mask. Actually you now look through the image.

In this case we still have discrete luminsity levels that produce discrete transparency levels of the final impage. I hope that by now you have already guessed where I am getting at.
What if we want a smoother transparency transition to our final image? Let's say we want our image to start from 100% Opaque and gradually smoothly turn to 100% transparent. Then all you have to do is to create a mask on top of your image with a nice black to white (or any other colors actually) Gradient. (Don't ask me about Gradients... go check my post All about Gradients).

Apply an Opacity Mask and there you go...
As you see, starting from the black areas of the rectangle the output is fully transparent and as you move towards the left, it gradually and smoothly turns opaque. Cool stuff...
2. The Transparency Panel
Let's spend some time to check the Transparency Panel.
After I have applied the Opacity Mask in my last image the Transparency Panel looked like that:

First you notice that there are two thumbnails available (ITEMS 1 & 3), one showing the photograph (ITEM 1) and one showing the mask (ITEM 3) with a lock icon in between (ITEM 2). By default the photo and the mask are locked together and what this does is that if let's say you decide to move the photo, then the mask is moved together. If for some reason you want to move the photograph but you do not want to move the mask (maybe you want to show another part of the photo), then click on the lock icon (it disappears...) and reposition the photo. The mask will stay in place.
If you now click on the Mask Thumbnail (ITEM 3), then you can edit the Gradient the way you would normally do. You may perhaps wanna pick the Gradient tool
 (like shown in a previous post) and adjust the Gradient like shown below.
 Pay attention when you click on the Mask thumbnail because Illustrator automatically switches to Opacity Mask Mode.
You can always look at Illustrator's title bar or open your Layers Panel (press F7) and check the mode you're working in.
OK... what happens if you uncheck the clip checkbox (ITEM 4)... Actually, the areas of the photograph outside the boundaries of the mask are visible after the Opacity Mask has been applied. It's your call...
 Finally,
clicking in the Invert Mask checkbox does exactly what it says. As we
discussed earlier, when you apply an Opacity Mask, lighter areas of the
Mask cause less transparency on the areas of the object that lies
underneath, while darker colors cause more transparency. If you check
this box, it works the other way round.
Finally,
clicking in the Invert Mask checkbox does exactly what it says. As we
discussed earlier, when you apply an Opacity Mask, lighter areas of the
Mask cause less transparency on the areas of the object that lies
underneath, while darker colors cause more transparency. If you check
this box, it works the other way round.To give you an example, let's go back to a previous image.
If I click in the checkbox the transparency changes direction. It goes reverse as shown below.

Finally, how can you remove the Opacity Mask? Very simple, just click on the masked artwork and then select Release Opacity Mask from the Transparency panel menu. The masking object reappears on top of the objects that were masked.

CU and Remember... the sky is the limit...


0 comments :
Post a Comment