CLICK ON THE IMAGE TO SEE FULL LARGE

Step 1
Open Photoshop and create a new document, the size I am using is 2560x1440 pixels because it's a nice HD wallpaper size. After that with the Ellipse Tool (U), create a circle in black.

Step 2
Create another circle, smaller and align both in the center of the document, after that, create a marquee selection of the smaller circle. To do that is super simple, just hold the Command (MAC)/ Control (PC) key and click on the thumb of the layer of the circle.

Create another circle, smaller and align both in the center of the document, after that, create a marquee selection of the smaller circle. To do that is super simple, just hold the Command (MAC)/ Control (PC) key and click on the thumb of the layer of the circle.
Step 3
Select the big circle and go to Layer>Layer Mask>Hide Selection. You will have a nice ring ready to add some chrome effects.

Select the big circle and go to Layer>Layer Mask>Hide Selection. You will have a nice ring ready to add some chrome effects.
Step 4
Go to Layer>Layer Styles>Color Overlay. Use a dark grey for the color.

Go to Layer>Layer Styles>Color Overlay. Use a dark grey for the color.
Step 5
Select Bevel and Emboss, then for the values use Inner Bevel for the Style, 550% for the Depth, 32 pixels for the Size, 2 pixesl for the Soften, 100º for the Angle, 30º for the Altitude. Also change the Gloss Contour for the one I am using in the image below as well as the values for the Highlight and Shadow mode.

Select Bevel and Emboss, then for the values use Inner Bevel for the Style, 550% for the Depth, 32 pixels for the Size, 2 pixesl for the Soften, 100º for the Angle, 30º for the Altitude. Also change the Gloss Contour for the one I am using in the image below as well as the values for the Highlight and Shadow mode.
Step 6
Select Inner Glow and use Color Dodge for the Blend Mode, 75% for the Opacity, white for the color. Then for the Choke use 0% and the Size 6 pixels.

Select Inner Glow and use Color Dodge for the Blend Mode, 75% for the Opacity, white for the color. Then for the Choke use 0% and the Size 6 pixels.
Step 7
Select Drop Shadow and use the values below, make sure that the angle is 90º and that you didn't mark Use Global light.

Select Drop Shadow and use the values below, make sure that the angle is 90º and that you didn't mark Use Global light.
Step 8
Create a black circle in the middle and then add another one a little smaller to create the center part of the button

Create a black circle in the middle and then add another one a little smaller to create the center part of the button
Step 9
With the small circle of the center selected, go to Layer>Layer Style> Gradient Overlay. UseNormal for the Blend Mode, 100% for the Opacity, and for the Gradient use a dark grey to black and Linear. Also for the Angle use 90º and Scale it to 75%.

With the small circle of the center selected, go to Layer>Layer Style> Gradient Overlay. UseNormal for the Blend Mode, 100% for the Opacity, and for the Gradient use a dark grey to black and Linear. Also for the Angle use 90º and Scale it to 75%.
Step 10
Select Bevel and Emboss. Use Inner Bevel for the Style, 80% for the Depth, 3 pixels for the Size and 0 for the Soften. For the Shading options use the image below.

Step 11
Add another circle using the Ellipse Tool (U), the with the Direct Selection Tool (A) edit the points and also with the Pen Tool (P) add 2 points and delete other 2 that were the horizontal center ones. The image below shows how this shape will look like.

Add another circle using the Ellipse Tool (U), the with the Direct Selection Tool (A) edit the points and also with the Pen Tool (P) add 2 points and delete other 2 that were the horizontal center ones. The image below shows how this shape will look like.
Step 12
Go to Layer>Layer Styles>Gradient Overlay. Use Screen for the Blend Mode use Screen. For the Opacity use 100% and for the Gradient use white and black for the colors, for the Angle use 90º and for the Scale use 140%.

Go to Layer>Layer Styles>Gradient Overlay. Use Screen for the Blend Mode use Screen. For the Opacity use 100% and for the Gradient use white and black for the colors, for the Angle use 90º and for the Scale use 140%.
Step 13
Here is the final result of our button/badge. Now it's time to add your logo. I used the Abduzeedo symbol I created in Illustrator and pasted in Photoshop so I could apply some layer styles.

Here is the final result of our button/badge. Now it's time to add your logo. I used the Abduzeedo symbol I created in Illustrator and pasted in Photoshop so I could apply some layer styles.
Step 14
With the logo selected go to Layer>Layer Styles>Gradient Overlay. Use the image below for values and the gradient colors. Then apply a bevel and emboss.

Step 15
Here is the final result of our logo with the metal symbol.

Step 16
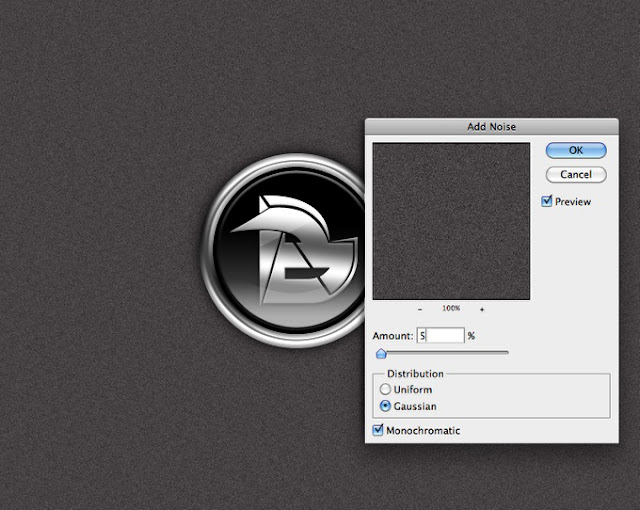
Let's create a nice texture for the background, to do that just select the background layer and go toFilter>Noise>Add Noise. Use 5% for the Amount, Gaussian for the Distribution and select Monochromatic.
Step 17
With the logo selected go to Layer>Layer Styles>Gradient Overlay. Use the image below for values and the gradient colors. Then apply a bevel and emboss.
Step 15
Here is the final result of our logo with the metal symbol.

Step 16
Let's create a nice texture for the background, to do that just select the background layer and go toFilter>Noise>Add Noise. Use 5% for the Amount, Gaussian for the Distribution and select Monochromatic.

Step 17
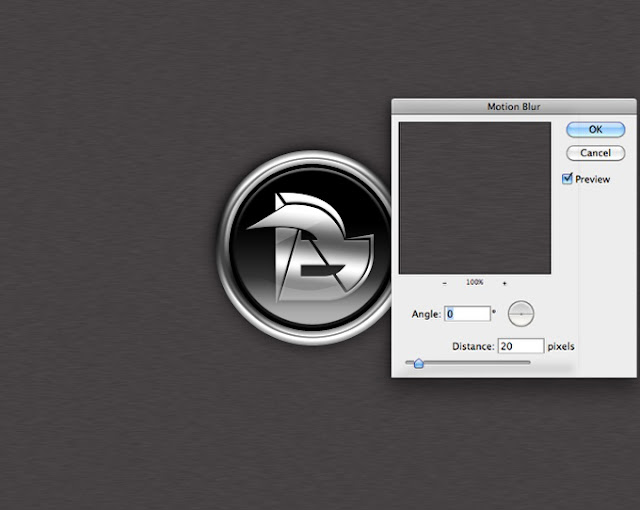
Go to Filter>Blur>Motion Blur. Use 0º for the Angle and 20 pixels for the Distance.
Step 18
Go to Layer>Layer Styles>Gradient Overlay. Use Multiply for the Blend Mode, 100% for the Opacity, black and white for the gradient color, Radial for the Style and 90º for the Angle.
Conclusion
As you could see the whole process was super simple, we just played with Layer Styles to create an amazing metal effect in Photoshop. This effect is perfect for icons or if you want to create a logo for an automobile company! Now it's all about practicing and trying different variations.

Version 2
Just playing with some light effects to create a nice Start button.
Download the Photoshop PSD File, 4Shared !


